As many of you may know, Julia over at http://www.juliabobbin.com/ hosts a Mad Men themed sewing challenge every year before the new season of Mad Men airs.
As someone who really enjoys mid-century fashion, I thought I would participate this year.
I decided I wanted to make a dress for my little sister. She and I looked over some possible pattern options, and we both decided on Simplicity 1609, a 1960's re-issue of a Jiffy shift dress.
The pattern has neckline options for a scalloped peter-pan collar, a bow, or a plain round neckline with facings. My sister decided she wants the collared option.
I have pretty much narrowed the fabric selections down to a navy cotton-linen blend with mild stretch, or a large scale paisley in a light blue and green colorway. Both of these are in my stash and wouldn't require any further shopping.
My sister is fine with either of these two options, although she originally said she wanted a solid yellow dress. When I let her know that I was hoping to use existing fabric and spend a minimal amount on the project, she said that whatever I selected was fine with her.
I am leaning toward the paisley print because it feels a little more spring-y than navy, However, I am unsure whether a large scale patterned fabric would compete with the more delicate detail of the collar. In addition, the paisley is a decor weight, so I'm wondering if it will be hard to match weights between the dress and the collar.
I'm planning on getting started this weekend. I'm interested to see how it comes together since the claim is that it should only take a "Jiffy" and is "Simple to sew using 2 main pattern pieces."
Is anyone else making something for the challenge? You can head on over to Julia Bobbin by clicking on the button in the sidebar if you're interested in what it's all about.
Friday, March 21, 2014
Tuesday, March 18, 2014
Little Fleece Coat for a Pup
I actually made this little doggie coat a little over a month ago and never posted about it.
I know, all you people who are shaking their heads right now. "Who puts clothes on their dog?" I used to think the same way you did. That was until my family got a small dog.
We had a medium sized French Bassett hound named Lucy during my growing up years. A hound dog, especially a sedentary breed such as the Bassett, is not the kind of dog you would think of needing to put clothes on. Lucy had a thick, almost oily water resistant double coat, as many hunting breeds do. Plus, Bassetts spend a majority of their time sleeping, and don't need much exercise to regulate their metabolism, so there wasn't as much need for added warmth for going on walks.
More recently, as we had to become used to the needs of our Yorkshire terrier Sprinkles, I have come to understand the utilitarian necessity of a warm jacket for some breeds. Many small dogs just don't have the body fat to stay warm on their own when outdoors. In addition, Yorkies don't have a thick double coat like many larger breeds do, and in fact have fine hair instead of coarse fur. So in order for little Sprinkles to stay warm during a wet-and-windy Washington winter walk (Alliteration! KA-BLAM![Who else remembers the show "Ka-Blam!"?]) she really does need a coat. Anyone who has ever tried to shop for a decently warm dog coat has, like me, experienced some serious sticker-shock. I decided I would just make one myself.
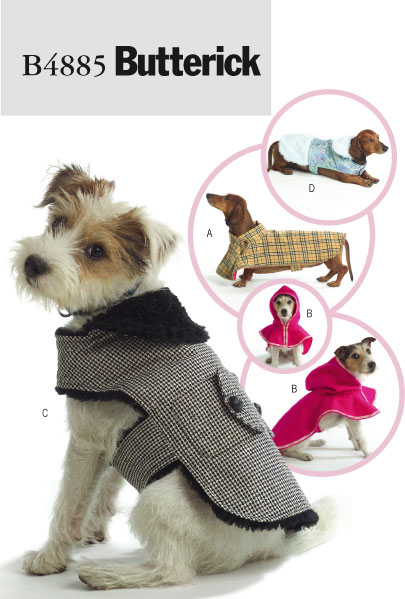
Enter Butterick 4885:
I know, all you people who are shaking their heads right now. "Who puts clothes on their dog?" I used to think the same way you did. That was until my family got a small dog.
We had a medium sized French Bassett hound named Lucy during my growing up years. A hound dog, especially a sedentary breed such as the Bassett, is not the kind of dog you would think of needing to put clothes on. Lucy had a thick, almost oily water resistant double coat, as many hunting breeds do. Plus, Bassetts spend a majority of their time sleeping, and don't need much exercise to regulate their metabolism, so there wasn't as much need for added warmth for going on walks.
More recently, as we had to become used to the needs of our Yorkshire terrier Sprinkles, I have come to understand the utilitarian necessity of a warm jacket for some breeds. Many small dogs just don't have the body fat to stay warm on their own when outdoors. In addition, Yorkies don't have a thick double coat like many larger breeds do, and in fact have fine hair instead of coarse fur. So in order for little Sprinkles to stay warm during a wet-and-windy Washington winter walk (Alliteration! KA-BLAM![Who else remembers the show "Ka-Blam!"?]) she really does need a coat. Anyone who has ever tried to shop for a decently warm dog coat has, like me, experienced some serious sticker-shock. I decided I would just make one myself.
Enter Butterick 4885:
This pattern has a variety of cute, tailored features in a range of sizes. Most importantly, the pattern includes an option for a hood.
I finally decided to sew it up in a low pile fleece, and doubled it up by using the same as the lining.
I selected view C, minus the pockets and substituting the hood from version B instead of the fold-back collar.
Here is the result:
The hood ended up a little big. In fact, it totally covers up Sprinkles head when it is up, so, yeah, not useable. However, it looks really cute and overall the coat is nice and warm. I would make it again, with some adjustments to the hood.
What do you think? Have you ever sewn anything for a pet?
Tuesday, March 4, 2014
T-Shirt Recycled to Pillow Tutorial
I recently revisited a recycled-materials project I have done in the past.
For this project I turned an embellished girl's t-shirt into a decorative pillowcase. My younger sister is at that pre-teen/ early teen age when girls just grow and grow like weeds. She is also at the transition from very cute girl's clothes to, in my opinion, more generic teen clothing. As a result she is outgrowing some barely used, nice quality clothes.
While I am a big believer in handing things on to acquaintances or charity-shops, sometimes there are items that are just to unique or delightful to let go of. In this case it was some embellished t-shirts from Gap- girl.
My sister actually asked me to make these shirts into decorative pillow cases for her bed, since they matched her "Paris Shopping Girl" themed room. I knew I could do it because I had done another one for her last year. And this time I actually remembered to take pictures of the process, so I will outline the process as a tutorial in case anyone else has had the same dilemma of not wanting to throw out cute t-shirts.
You will need:
Embellished cotton jersey t-shirt
Thread (color should be in the same intensity, ie pink tee+ white thread, not black)
Scissors or rotary cutter
Ruler
Pins
Pillow insert (depending on size of shirt)
Step One
Make sure your t-shirts are clean and wrinkle free. I don't usually iron knit shirts. Instead I hand them on hangers straight out of the washer and let gravity do the work for me.
Step Two
Turn the shirts inside out and lay flat with the embellished side facing up toward you. Use a ruler to make a straight line continuing in the line of the side seam over the sleeves to the top of the shirt. Trace the line with seamstress' chalk/ pen and cut along the line. If you are using a rotary cutter you can just line it up on the ruler and cut. Note: You will have to include the armhole seam inside your cutting line. The last time I did this project it was with a raglan-sleeveless tee, and that had a little bit smoother finished look. But it will be fine in the end if your pillow is big enough to stretch out the fabric a bit.
Pin along your raw edges and sew a straight stitch from the side-opening up to the top, then the top edge, then the other side edge. I haven't sew with knits much, so all I can say is that you may want to make sure that the thread tension is decreased slightly to prevent puckering. Otherwise, I just set it up like I was sewing a straight stitch on a woven fabric.
Not being well versed in knits, I also don't have a serger. So, since this was meant to be a quick-and-easy project I just sewed a straight stitch first, then went back over with a zig-zag stitch to create kind of a faux serged edge. You can see it before I trimmed the seam allowance in the picture on the right.
Step Four
Turn inside out and insert your pillow. I used the inexpensive pillow insert brand from Jo Ann Fabrics, and those work just fine for a decorative pillow. In this case, and last time, I used an 18" square. This worked for a girl's medium shirt the first time and a girl's x-large shirt this time. Any larger and I would say you probably want to use a 20" square just to be sure that it will stretch the fabric enough to keep the image or embellishment smooth. Also, if you have poly-filling and don't want to go out and buy a pillow insert, you could sew most of the bottom edge, leaving a 5 in gap in the center,fill up your pillow case, then sew the last of the bottom edge closed by hand.
For this project I turned an embellished girl's t-shirt into a decorative pillowcase. My younger sister is at that pre-teen/ early teen age when girls just grow and grow like weeds. She is also at the transition from very cute girl's clothes to, in my opinion, more generic teen clothing. As a result she is outgrowing some barely used, nice quality clothes.
While I am a big believer in handing things on to acquaintances or charity-shops, sometimes there are items that are just to unique or delightful to let go of. In this case it was some embellished t-shirts from Gap- girl.
My sister actually asked me to make these shirts into decorative pillow cases for her bed, since they matched her "Paris Shopping Girl" themed room. I knew I could do it because I had done another one for her last year. And this time I actually remembered to take pictures of the process, so I will outline the process as a tutorial in case anyone else has had the same dilemma of not wanting to throw out cute t-shirts.
You will need:
Embellished cotton jersey t-shirt
Thread (color should be in the same intensity, ie pink tee+ white thread, not black)
Scissors or rotary cutter
Ruler
Pins
Pillow insert (depending on size of shirt)
Step One
Make sure your t-shirts are clean and wrinkle free. I don't usually iron knit shirts. Instead I hand them on hangers straight out of the washer and let gravity do the work for me.
Step Two
Turn the shirts inside out and lay flat with the embellished side facing up toward you. Use a ruler to make a straight line continuing in the line of the side seam over the sleeves to the top of the shirt. Trace the line with seamstress' chalk/ pen and cut along the line. If you are using a rotary cutter you can just line it up on the ruler and cut. Note: You will have to include the armhole seam inside your cutting line. The last time I did this project it was with a raglan-sleeveless tee, and that had a little bit smoother finished look. But it will be fine in the end if your pillow is big enough to stretch out the fabric a bit.
Repeat this process with the top of the shirt. You will want to line your ruler up just below the neck opening to guarantee that you don't lose any of the image/ embellishment to the sewing and turn-out process. It will also make for a centered image on the front of the pillow.
Step Three
Not being well versed in knits, I also don't have a serger. So, since this was meant to be a quick-and-easy project I just sewed a straight stitch first, then went back over with a zig-zag stitch to create kind of a faux serged edge. You can see it before I trimmed the seam allowance in the picture on the right.
Step Four
Turn inside out and insert your pillow. I used the inexpensive pillow insert brand from Jo Ann Fabrics, and those work just fine for a decorative pillow. In this case, and last time, I used an 18" square. This worked for a girl's medium shirt the first time and a girl's x-large shirt this time. Any larger and I would say you probably want to use a 20" square just to be sure that it will stretch the fabric enough to keep the image or embellishment smooth. Also, if you have poly-filling and don't want to go out and buy a pillow insert, you could sew most of the bottom edge, leaving a 5 in gap in the center,fill up your pillow case, then sew the last of the bottom edge closed by hand.
And there you have it!
A great way to re-purpose a cute tee that you'd rather not give away.
What do you think?
Have you ever used a fashion item to re-purpose as a decor item?
Or maybe the reverse?
Let me know in the comments.
Wednesday, July 10, 2013
Body Image, Clothes Sewing, and Elitism
One of the reasons I decided to learn how to sew garments was due to my feelings about body image. Specifically, I feel that the mass media and mass market do not allow for the reality and variety of body types in the RTW clothes that they sell.
I just finished reading a post by Ohhh Lulu about body image in regards to self-sewn lingerie and negative commenting on the internet. The article addresses how we need to stop judging each others bodies so harshly and vocally. While I agree with the spirit of what the author is trying to say, this does not address the root of negative rhetoric regarding body image in our culture.
What most people don't realize is that the hegemonically "perfect" body, which many aspire to but no one can achieve, is driven by elitism. When you really consider what the "best" bodies consist of, you realize that the "bad" bodies are really "poor" bodies.
For example, most people do not find a body wracked by malnutrition, abuse, and disease to be attractive. This is not only because this body looks unhealthy and possibly close to death, but also because it it obvious that the body does not have access to the resources reserved for the elite.
Contrary to popular belief, the majority of obese bodies, also considered unattractive, are from backgrounds of poverty as well. In fact, that the greatest indicator of obesity in the first world is poverty. In America, the poor deal with excessive stress, known to be a trigger for weight gain, as well as working irregular and/or long hours, have little leisure time apart from that which must be spent sleeping or maintaing their person-and-household, have little to no vacation time, and few benefits such as healthcare. They often work in stressful, demeaning, and unsafe environments, for little recognition and low pay. As a result, they have little money to spend on food, and focus on cheap, quick, "filling" foods which are high in calories but low in nutritional value.
Finally, the elite structures of society send messages to these people with "bad bodies" through media, the true opiate of the masses, to make them feel ugly and unaccepted. This can lead to depression, feelings of inefficacy, and complacency which insure that individuals are focused on their inner turmoil and personal flaws instead of joining with their peers and affecting change.
So yes, we do need to stop judging each other and using mean language against each other. But more importantly, we need to stop judging ourselves and focusing on ourselves. When we focus instead on the world as a whole, we can be more effective in serving each other and God.
I just finished reading a post by Ohhh Lulu about body image in regards to self-sewn lingerie and negative commenting on the internet. The article addresses how we need to stop judging each others bodies so harshly and vocally. While I agree with the spirit of what the author is trying to say, this does not address the root of negative rhetoric regarding body image in our culture.
What most people don't realize is that the hegemonically "perfect" body, which many aspire to but no one can achieve, is driven by elitism. When you really consider what the "best" bodies consist of, you realize that the "bad" bodies are really "poor" bodies.
For example, most people do not find a body wracked by malnutrition, abuse, and disease to be attractive. This is not only because this body looks unhealthy and possibly close to death, but also because it it obvious that the body does not have access to the resources reserved for the elite.
Contrary to popular belief, the majority of obese bodies, also considered unattractive, are from backgrounds of poverty as well. In fact, that the greatest indicator of obesity in the first world is poverty. In America, the poor deal with excessive stress, known to be a trigger for weight gain, as well as working irregular and/or long hours, have little leisure time apart from that which must be spent sleeping or maintaing their person-and-household, have little to no vacation time, and few benefits such as healthcare. They often work in stressful, demeaning, and unsafe environments, for little recognition and low pay. As a result, they have little money to spend on food, and focus on cheap, quick, "filling" foods which are high in calories but low in nutritional value.
Finally, the elite structures of society send messages to these people with "bad bodies" through media, the true opiate of the masses, to make them feel ugly and unaccepted. This can lead to depression, feelings of inefficacy, and complacency which insure that individuals are focused on their inner turmoil and personal flaws instead of joining with their peers and affecting change.
So yes, we do need to stop judging each other and using mean language against each other. But more importantly, we need to stop judging ourselves and focusing on ourselves. When we focus instead on the world as a whole, we can be more effective in serving each other and God.
Wednesday, June 12, 2013
A Little Tip: Reviving a Squashed Hat
I ordered a cute synth-straw boater hat from an e-bay China based seller. It came quickly, but flat-packed in an envelope. (Of course, I didn't think to take a 'before' picture.) It was pretty squashed, looking more like a fisherman's floppy hat than a pert boater.
But I had anticipated this, and was ready to steam it back to its prim-shaped glory.
All it took was:
- an iron
- water
- some brown packing paper
- a 6 in small round cake-pan
- spray-starch (optional.)
Then I set it on my ironing board and went to town! I puffed steam onto the hat on the wool setting, then turned it down to synthetic to iron the brim, crown, and top back into shape.
I made sure to keep the iron moving quickly the whole time to avoid singeing whatever the hat is made of (probably paper or polypropylene).
I had to go over it a couple times, but it looked great once I was done.
I let the hat sit on the ironing board to cool and dry, then applied a coat of spray-canned starch to help it hold its shape.
![]() |
| Forgive the over-brightness. My phone camera isn't great, but this hat is! |
It looks great! I'm sure I will be posting pics of me wearing it this summer!
Tuesday, June 11, 2013
Summer Sewing Schedule
Hello!
It has been awhile since I have blogged... for a couple reasons.
The main reason is that I have been stalled on my Gatsby blouse. Obviously I had tackled a project that is a little bit beyond my current skill level. I am picking away at it now, even though the Gatsby Challenge deadline has passed. However, I think I will post the completed outfit on the Dressing Downton Flikr group. The blouse and skirt were really more inspired by that aesthetic anyways.
In other news, I have decided to create a summer sewing schedule. Most of these items have the outside goal of being completed before I go on our annual family beach vacation in the third week of August. But obviously they will be useful for the rest of the summer as well. Here is my schedule month-to-month:
June:
I hope I can keep up a steady pace and get all these done by the time we go on vacation!
Do you like to make a schedule of projects you hope to complete in the coming months?
Are there any summer sewing projects you are excited about?
Have a great Tuesday!
...Amber
It has been awhile since I have blogged... for a couple reasons.
The main reason is that I have been stalled on my Gatsby blouse. Obviously I had tackled a project that is a little bit beyond my current skill level. I am picking away at it now, even though the Gatsby Challenge deadline has passed. However, I think I will post the completed outfit on the Dressing Downton Flikr group. The blouse and skirt were really more inspired by that aesthetic anyways.
In other news, I have decided to create a summer sewing schedule. Most of these items have the outside goal of being completed before I go on our annual family beach vacation in the third week of August. But obviously they will be useful for the rest of the summer as well. Here is my schedule month-to-month:
June:
- Finish blouse for Dressing Downton outfit (Simplicity 1779 view D)
- Finish plaid-top Traveler dress (UFO from last summer/ Lisette Traveler dress view C )
- Yellow gingham circle skirt (using The Snugbug circle skirt tutorial)
- Chambray sleeveless dress (from Lisette Passport dress view A)
- Border-print full skirt (using Gertie's full-gathered skirt tutorial)
- Swiss-dot sweetheart blouse (from bodice of Simplicity 2442 view B)
- Chambray button-down shirt (from Lisette Traveler dress view C)
- Chambray full skirt (using Gertie's full-gathered skirt tutorial and wide waistband from another skirt)
- Re-fashion pink trousers to scalloped shorts (pants=too much pink!)
- Re-fashion black sailor pants to shorts, maybe replace buttons for contrast (pants= don't notice sailor button detail)
- Plaid summer jacket (from Lisette Passport jacket view D)
- Riley Blake Lavender Glasses print dress (from Lisette Passport dress view A)
- Aqua pencil skirt (Simplicity 2451 view C but below-knee)
I hope I can keep up a steady pace and get all these done by the time we go on vacation!
Do you like to make a schedule of projects you hope to complete in the coming months?
Are there any summer sewing projects you are excited about?
Have a great Tuesday!
...Amber
Wednesday, May 1, 2013
Zipper and Tragedy
While working on my skirt for the Great Gatsby Sewing Challenge on Sunday I came across some difficulty in the zipper department.
Iam making have made the skirt in a nice medium weight poly/ wool blend coating in an eggplant purple color. When I got to the zipper step, I tried to be a good girl and go by the pattern instructions and sew the zipper from the right-side of the skirt. However, with the thickness of the wool and the bias-tap seam binding, I had to start over twice when I had a thread snag after the initial few stitches across the base of the zipper. I think it was the weight in combination with the dark color of the fabric that was making things hard.
I stood up to unpick the snags in front of my ironing board and when I turned to sit back down in front of my sewing machine I tripped over my iron cord THROWING MY IRON TO THE FLOOR!
Now, our sewing room is in the basement, so this was a fall to wood over concrete floors. As I looked in disbelief at my iron, now laying in a puddle of water on the floor, I was sure that my it was totally broken and would never even turn on!
This was even more sad, because I had bought the iron, a Rowenta, at a great mark down, almost 60% off since it was a floor model at Target. I knew I would never be able to replace it for the $36 I had originally spent.
When I looked it over I could hear a rattling behind the bottom of the faceplate. It turned back on and it seemed to heat properly, but any water I attempted to pour into the steam reservoir quickly leaked out of the base of the iron.
OH NO! I thought, I CAN'T DO ANY DECENT FINISH WORK WITHOUT A GOOD STEAM IRON!
I sat down and finished my zipper. From the inside this time, with a piece of 1/2 inch tape over the zipper seam as a guide. It came out perfect, looking great from front and back.
When my mom came home and came in to check on my progress, I told her about my iron tragedy, and how I wouldn't be able to finish my project, let alone future projects without a good functioning iron, and I didn't know how I was going to come up with the money for a new iron.
Luckily, she said that she would help me out by buying it for me so I could stretch the purchase out between two paychecks. Yeah mom!
And I was only set back by one day, because she was able to take me shopping on Monday night.
I got another Rowenta for $89 (eek!). I know you don't have to pay that much for a good iron, but I didn't want to have to order from Amazon and wait a week for my iron only to find that mine had been damaged in transit. I don't shop at Wal-Mart for moral reasons, so the brands they carry there were out. I didn't want to buy one at Jo Ann's, since I know their appliances are usually pricey unless they have a sale on them. So I went with what had worked for me last time and bought a Rowenta at Target. I also got a new ironing board so I could have one with the iron holding rack at the end and not risk another one falling and dieing.
I finished up the skirt on Tuesday and it looks pretty good if I do say so.
My camera batteries were dead or I would have uploaded a picture.
I will have to remedy that.
Next up, I will start on my blouse. Wish me luck on the sleeves!
I
I stood up to unpick the snags in front of my ironing board and when I turned to sit back down in front of my sewing machine I tripped over my iron cord THROWING MY IRON TO THE FLOOR!
Now, our sewing room is in the basement, so this was a fall to wood over concrete floors. As I looked in disbelief at my iron, now laying in a puddle of water on the floor, I was sure that my it was totally broken and would never even turn on!
This was even more sad, because I had bought the iron, a Rowenta, at a great mark down, almost 60% off since it was a floor model at Target. I knew I would never be able to replace it for the $36 I had originally spent.
When I looked it over I could hear a rattling behind the bottom of the faceplate. It turned back on and it seemed to heat properly, but any water I attempted to pour into the steam reservoir quickly leaked out of the base of the iron.
OH NO! I thought, I CAN'T DO ANY DECENT FINISH WORK WITHOUT A GOOD STEAM IRON!
I sat down and finished my zipper. From the inside this time, with a piece of 1/2 inch tape over the zipper seam as a guide. It came out perfect, looking great from front and back.
When my mom came home and came in to check on my progress, I told her about my iron tragedy, and how I wouldn't be able to finish my project, let alone future projects without a good functioning iron, and I didn't know how I was going to come up with the money for a new iron.
Luckily, she said that she would help me out by buying it for me so I could stretch the purchase out between two paychecks. Yeah mom!
And I was only set back by one day, because she was able to take me shopping on Monday night.
I got another Rowenta for $89 (eek!). I know you don't have to pay that much for a good iron, but I didn't want to have to order from Amazon and wait a week for my iron only to find that mine had been damaged in transit. I don't shop at Wal-Mart for moral reasons, so the brands they carry there were out. I didn't want to buy one at Jo Ann's, since I know their appliances are usually pricey unless they have a sale on them. So I went with what had worked for me last time and bought a Rowenta at Target. I also got a new ironing board so I could have one with the iron holding rack at the end and not risk another one falling and dieing.
I finished up the skirt on Tuesday and it looks pretty good if I do say so.
My camera batteries were dead or I would have uploaded a picture.
I will have to remedy that.
Next up, I will start on my blouse. Wish me luck on the sleeves!
Subscribe to:
Posts (Atom)